miércoles, 26 de septiembre de 2012

Unit 1


1.- Define what technology is
2.- Learn and comprehend the steps of a technological process
3.- Design a new technological object that can solve a problem
4.- Plan the model of a technological object
5.- Design a technological object from scratch
6.- Prepare a work-plan
7.- Calculate an estimate of your project
8.- Evaluate your project

lunes, 24 de septiembre de 2012

Mix and match I

1.- Get rid of by throwing away, giving or selling to someone else.
2.- A thing made for a particular purpose.
3.- At the present time.
4.- Marked by exactness and accuracy of expression and detail.
5.- To concentrate.
6.- Really
7.- To administer and regulate.
8.- Grasp mentally; understand.
9.- Human beings considered collectively.
10.- A small mechanical device or tool.

lunes, 18 de junio de 2012

Making the lamp IV- Homework

So, here you have the tutorial for making your homework with our lamp project. This tutorial is meant to be done during Monday and Tuesday, but you can organize yourselves as you prefer.

PART 1: finishing the shade riser.

   In 2ºAB we already covered this part, but we did not have time to do it in 2ºCD, so, everybody from 2ºCD pay attention: you need to cut an inner circle in your shade-risers-base. You started with something like this:


and you need to cut out a circle so the lamp-holder can fit through it and hold it when we screw the lamp holder together, like this:


Now, everybody, should have 4 pieces of cardboard which are 2 cm thick and 25 cm long, and a piece of cardboard which is 2 cm thick and 31.5 cm long. We are going to start with the latter.

 Take the 31.5 cm long piece of cardboard and join the edges, forming a circle. You can use isolating tape to keep it together. Now wrap isolating tape all around your circle, like in the picture:


Now it is time to use the other 4 pieces of cardboard. Remember you should have marked a distance of 5 cm on them. The first thing to do would be to bend those strips following that line you have drawn.


Now take the ring you have made and wraped in isolating tape and stick the four cardboard strips to it. Imagine the ring is a watch, you have to stick the four strips of cardboard following the pattern: one at 3, one at 6, one at 9 and one at 12. To do this, use superglue.


Ready for the tricky part? Do not worry, it sounds difficult but it is not difficult at all. Now, as you´ve seen, you have ended up with a, so to speak, 4-legs-octopus, this octopus is going to add the 3rd dimension to your shade riser. You are going to stick the 5cm parts of the strip to the "wheel" you started with, making sure that the bent matches both the outter circle of the wheel and the radious of the wheel it sits upon. You can make a preliminary try hodling it with cloth-pegs to see how it´s finally going to work:


In order to stick the legs to the wheel use superglue again, but be careful, you do not need a lot of superglue here, apply it to the 4 edges of the leg and that will be more than enough. You should end up with something, very very similar, to this (but not painted):


And now... time to have some fun! Use an empty yogourt pot (of similar) to create a magic potion: 80% white glue + 20% water. Mix it thoroughly until you get an even goo and now spread it all over the shade-riser. Yep, all of it! Don´t miss a bit! make sure everything gets covered by your magic goo! This is the part that, after 24 hours of rest, will end up by giving us a hard shade-riser, even when it´s made of cardboard.

Leave the shade-riser aside, and let´s start with the ...

PART 2- Electronics

   You got a piece of cable that I gave you today, first of all DON´T CUT IT IN TWO HALVES UNTIL WE GET TO THE LAMP HOLDER PART!

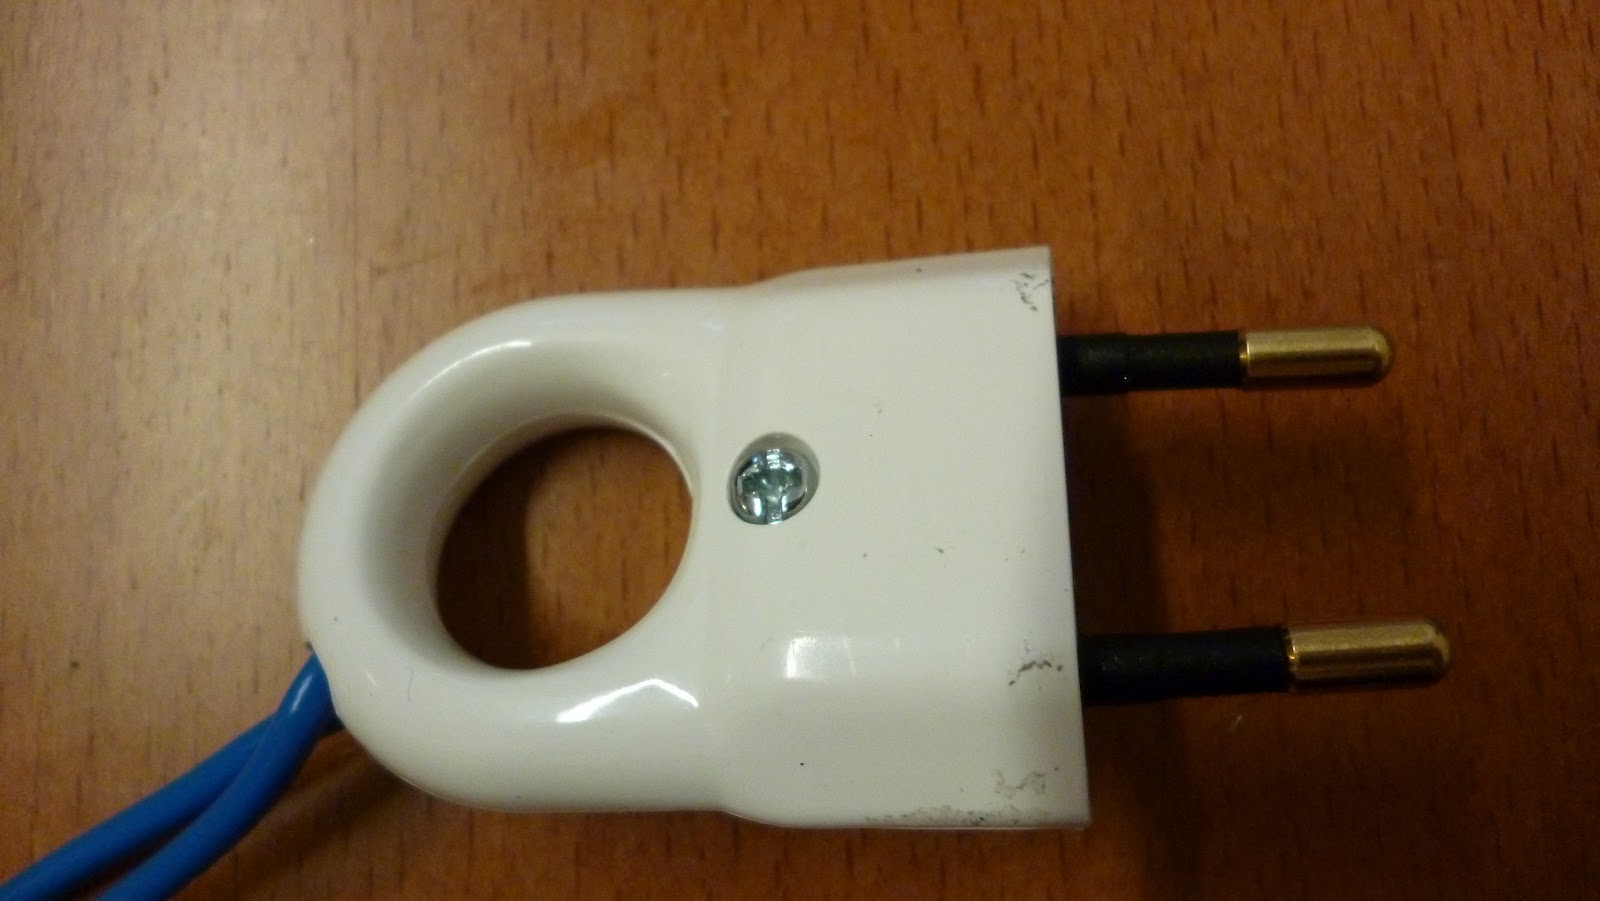
    Starting with the plug, we will use the too loose ends of your cable. Unscrew the plug:


Now you will see two terminals, peel the edge of the cable until you get a clear shot of copper.To do so, cut, with your scissors, the plastic that´s covering it and pull outwards (WARNING: DO NOT PEEL THE CABLES USING YOUR TEETH, COPPER FIBRES ARE VERY VERY SHARP AND THEY PRODUCE PAINFUL CUTS IF YOU DON´T NOW HOW TO DO IT PROPERLY. ALSO, THEY CAN HARM YOUR TEETH). Now remove the screws in the terminals and pass the copper through the holes, securing them again but screwing the screws back where they belong:


And put it back into place:


Now cut both cables wherever you want to introduce the switch:


And, as we did with the plug, install the switch:


Finally, remember to bring the screwdriver with you so we can finish the electronics with the lamp holder on Wednesday.


Making the lamp III


viernes, 15 de junio de 2012

Making the lamp II- Homework for Monday

Hello everybody, this is what you have to bring done and finished, for Monday:

1.- Draw the following picture on a piece or cardboard (the outer circle should have a diameter of 30-35 cm. Not that it is really symmetrical, you can observe a better shot of the design in the second picture):


2.- Now cut it:


NOTE THAT YOU -STILL- NEED TO BRING CARDBOARD TO CUT OFF MORE PIECES ON MONDAY.

jueves, 31 de mayo de 2012

Judging the cities- 1st of June

Your task so far...

   We are going to evaluate the cities that you have created.  In order to do so, if you are from 2ndAB click here to evaluate the cities made by 2ndAB's students. If you are from 2nd CD click here to evaluate the cities made by 2ndAB's students.


    I am sure you will be fair and you will remember that most of you worked really hard to accomplish your goal and create this city, but you can´t be biased, you have to be clear and praise what has been done right as well as noticing what is missing or what has been done wrong. To do so, you will have to post a comment to every city. This comment should start with the following sentence: Hello, we are "NAME OF YOUR GROUP" and this is our impression of your city:


 Remember, these were the instructions you needed to follow in order to produce a modern city:


Hello there!
           
            You must be the clever technicians, artisans, architects and engineers who where hired to build a Medieval city in a faraway land. Welcome to our city! As you see, it´s a little out of date, so we were hoping you could be able to improve it with the new technologies of the 21st century.
            Here you have some of the demands we would like you to consider:

-We think cardboard is not very fashionable and it doesn´t keep us warm, we would prefer our buildings to be made of wood, it would not be a problem if our city has to be smaller!
-Nowadays, we have a Town Hall and plumbing, and sewers and highways, could you do that for our city! (Yes, I know you would have to reduce the scale of the city, but we are sure you can manage).
-We want to have a bridge too. Bridges seem to be quite important, a modern one.
-We also demand having an airport, communications and travel are quite hard these days without it!
-And don´t forget about entertainment! Our people deserve to have some places where to have fun, don´t they?


   According to this, every comment you make to every city should start by clearly stablishing the things that they did correctly and the things that they miss, like:
   
     Hello there, we think you made a great/good/regular job. From the ideal city, you managed to make houses so people could live, but they were supposed to be made of wood and you did not use wood. You also made the bridge, well done! Not too many groups remebered it.


Now add your personal opinion, do you like it? could it be better? Does it look nice? Does it look too big? Is it similar to the design you wanted to reproduce? Look carefully at the design of the city, is it correct? Is there any item missing? (hardly anyone remembered to add the meassurements when designing the city). How can you identify an airport? Are airports identified by a massive sign in which you read "AIRPORT" in real life?


At the end of your commentary, give a mark to the city (0-10) which numerically illustrates your written opinions.

IMPORTANT: when you click on "post" your comment, your comment will be sent to me and will not be published until Sunday, your comment is sent but awaits moderation.


Project 1

Your starting point was this one:


Your final project looked like this:


Project 2

Your starting point was this one:


Your final project looked like this:


Project 3

Your starting point was this one:


Your final project looked like this:


Project 4

Your starting point was this one:


Your final project looked like this:


Project 6

Your starting point was this one:


Your final project looked like this:


Project 9

Your starting point was this one:


Your final project looked like this:


Project 7

Your starting point was this one:


Your final project looked like this: